Workspaces and Properties in Adobe Target Premium
— Adobe Target, Target Premium — 3 min read
Administering Adobe Target
Workspaces and Properties in Adobe Target Premium are a powerful way to enable multiple teams or environments to use Target efficiently in a dedicated space. Best way to think about this is to imagine American and European teams sharing Target solution in the organization without overlapping with each others' activities that include user roles, Target activity setup, reporting, etc. Each team has their own instance of Target they are working on.
Adobe Target Standard uses a default Workspace, shared by everyone. In Target Premium, we can create a new Workspace separately from default one. Each Workspace will need to use a Property to limit content delivery to only specified Property using a token. Property tokens will be visible in all Target calls to ensure visitors receive content from desired Property and Workspace.
The following table lists the tasks you should perform to create a Workspace, Properties and assign user roles and permissions.
| Task | Performed In |
|---|---|
| 1. Add users (optional) | Adobe Admin Console for Enterprise |
| 2. Create a Workspace (product profile) | Adobe Admin Console for Enterprise |
| 3. Create Properties | Target UI |
| 4: Update your implementation to include the Property token | Target UI, at.js functions, or tags in Adobe Experience Platform |
| 5: User Roles and Permissions | Adobe Admin Console for Enterprise |
For those tasks performed in the Adobe Admin Console for Enterprise, access the console by following these steps:
In Adobe Target, click Administration > Properties > Assign Properties to Workspaces or go to https://adminconsole.adobe.com/enterprise to sign.
Step 1. Add Users (Optional)
When you start using the new Properties functionality, all user management must be performed in the Adobe Admin Console for Enterprise. However, all of your existing users in Target will be migrated from Target to the Admin Console for Enterprise.
- In the Admin Console, click the Users tab at the top of the page > Add Users to create new users or to edit existing users.
- Follow the steps to create and manage Users and Groups in the Experience Cloud.
Step 2. Create a Workspace (Product Profile)
A Workspace (product profile) lets an organization assign a specific set of users to a specific set of properties. In many ways, a Workspace is similar to a report suite in Analytics.
Organizations can begin taking advantage of Enterprise permissions functionality by creating new Workspaces within Admin Console, assigning Target Properties to these Workspaces, and moving users from the "Default Workspace" configuration to these newer, limited-access Workspaces.
We can use these Workspaces to separate access to different teams by region, by business unit, by site section, or via any other method they choose.
Users can be part of multiple Workspaces and can even have different roles within each Workspace.
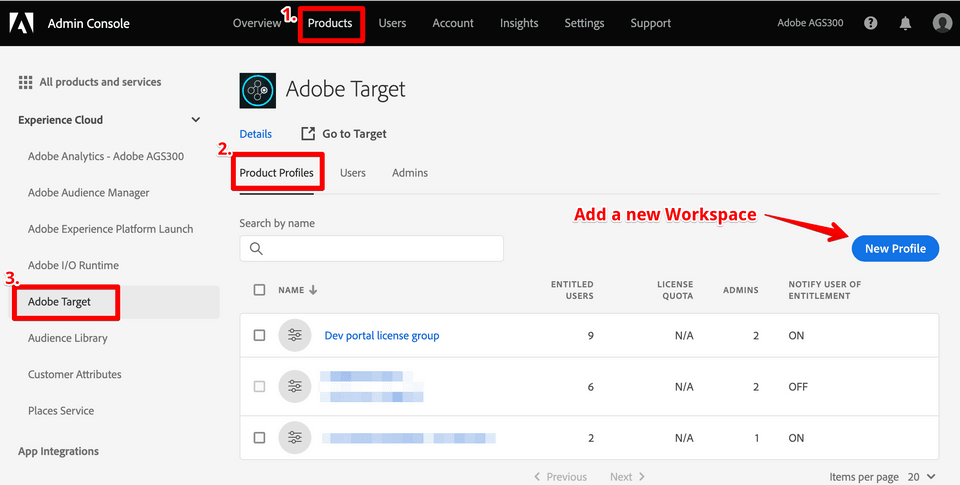
In the Admin Console, click Products, then select Adobe Target.
Create the desired Workspace (Product Profile):
- To create a new Workspace, you start by creating a new product profile for Target. You just give it a name and save it. This takes you back to the list of product profiles. Click on the newly created profile and,
- Click Users and follow steps to add a user for this Workspace with appropriate Target permissions (Approver, Editor, Publisher, Observer)

Step 3. Create Properties
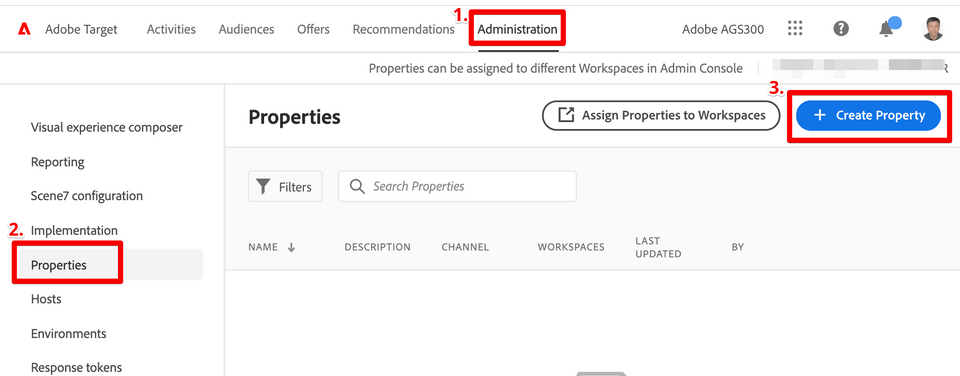
Go to Target -> Administration -> Properties and add a new Property. Fill in the fields:
- Property Name (Required): Specify a descriptive name for the property.
- Description: Specify an optional description for the property.
- Channel: Select the desired channel for the property: Web, Mobile App, Email, or Other/API (for example a set-top box or PlayStation console).
Then, on the "Permissions" tab, find your new property and "edit" it. Move it from "Available Permission Items" to "Included Permission Items" and "Save"

Step 4: Update your implementation to include the Property token
To use the Target user-permissions functionality, you must add the Property token to any call that is hitting Target (Target call, API call, etc.).
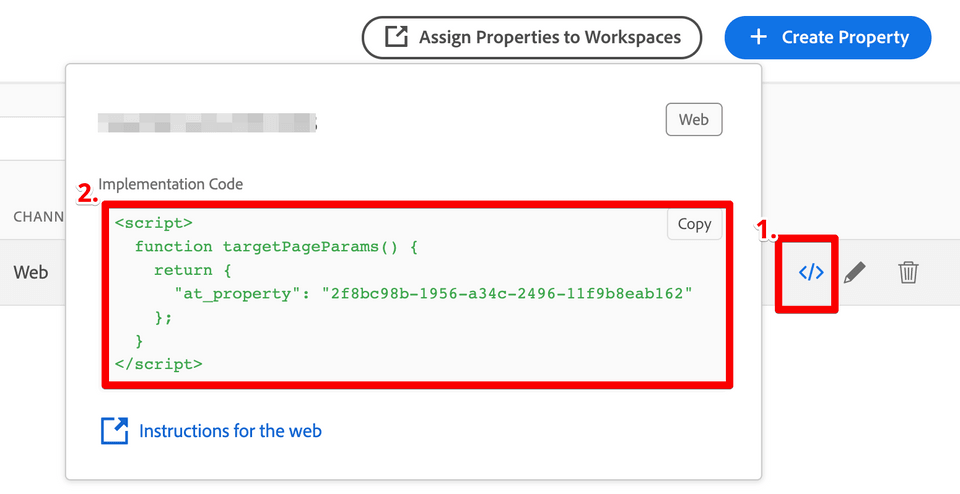
To obtain the Property token code:
In Target, click Administration > Properties to display the Properties list.
Hover your mouse pointer over the desired property and click the Code icon.
Copy code to your clipboard.

Update your Target implementation with the implementation code obtained in the previous step.
There are several ways to update your Target implementation. For example, the following methods can be used for web pages:
- Via the targetPageParamsAll() function: Place the following code in the
<head>tag, above the at.js reference.
1<script>2 function targetPageParamsAll() {3 return {4 "at_property": "5f8bd98b-1456-a84c-2a96-11s9b8e2b112"5 };6 }7 </script>Via Custom Parameters added in Adobe Experience Platform
If you are using Adobe Launch, you can leverage Adobe Target extension to add
at_propertyparameter to all Target Requests.
- Via the targetPageParamsAll() function: Place the following code in the
Step 5: User Roles and Permissions
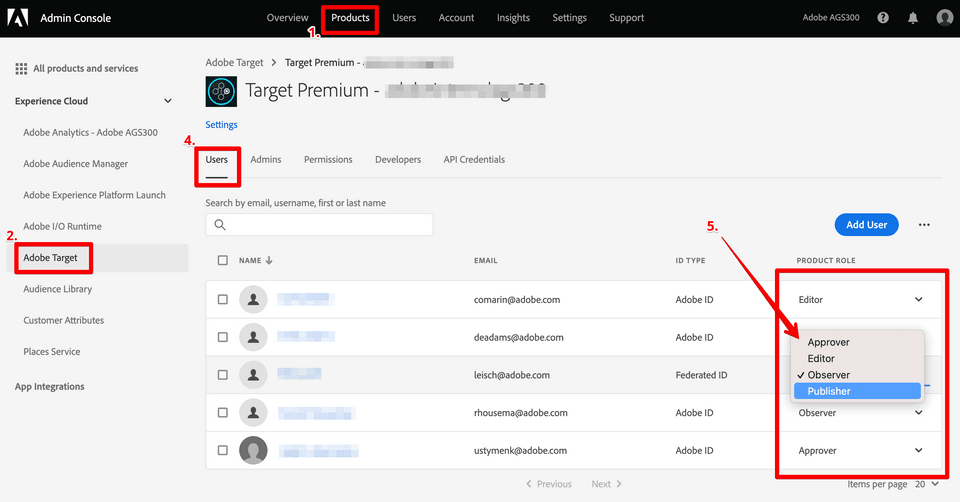
In the Admin Console, click Products, then select the name of the desired product.
Click the name of the desired profile (for example, Default Workspace).

Click Users.
The Users tab displays all of the users in that Workspace.
Select the desired permissions role (Approver, Editor, Observer, or Publisher) by using the drop-down list for each user in the column.
Role Description Approver Can create, edit, and activate or stop activities. Editor Can create and edit activities before they are live, but cannot approve the launch of an activity. Observer Can view activities, but cannot create or edit them. Publisher Similar to the Observer role (can view activities, but cannot create or edit them). However, the Publisher role has the additional permission to activate activities.